🚀 Universal Data Entry in Odoo
📝 Tired of creating records one by one in Odoo?
Universal Data Entry module introduces a powerful spreadsheet-style interface that allows you to create multiple records quickly and efficiently — just like working in Excel. The Universal Data Entry Module provides a flexible interface for creating records across most Odoo models. Users can dynamically select models and enter data without needing dedicated forms for each model. It simplifies bulk data input and centralizes data entry workflows.
Open in Odoo App Store▶️ YouTube Demo
Watch the full demo of the Universal Data Entry Module in action on YouTube. Learn how to create records, configure excluded models, and manage your data entry workflow efficiently.
✨ Key Features
- ✅ Spreadsheet-style data entry interface
- ✅ Bulk create records in any Odoo model
- ✅ Dynamic model selection
- ✅ Smart validation and error handling
- ✅ Configurable model exclusions (by specific model, prefix, postfix)
- ✅ Data entry history tracking
- ✅ Clean and user-friendly UI
- ✅ Powerful Reporting section
- ✅ Open destination record from history
- ✅ Reference tracking for each data entry operation
💡 Why Use This Module?
- ⏱️ Save hours of manual data entry
- 📈 Increase team productivity
- ⚠️ Reduce human errors
- 📊 Simplify large dataset creation
🎯 Who Is This Module For?
- 👨💻 Data entry operators
- 🛠️ Odoo administrators
- 🏢 Businesses managing large datasets
- ⚡ Any team needing fast record creation
📦 Included Features
- 🔒 Secure access control
- 🗂️ Record rules and permissions
- 🔗 Backend integration with Odoo framework
🗂️ Sections
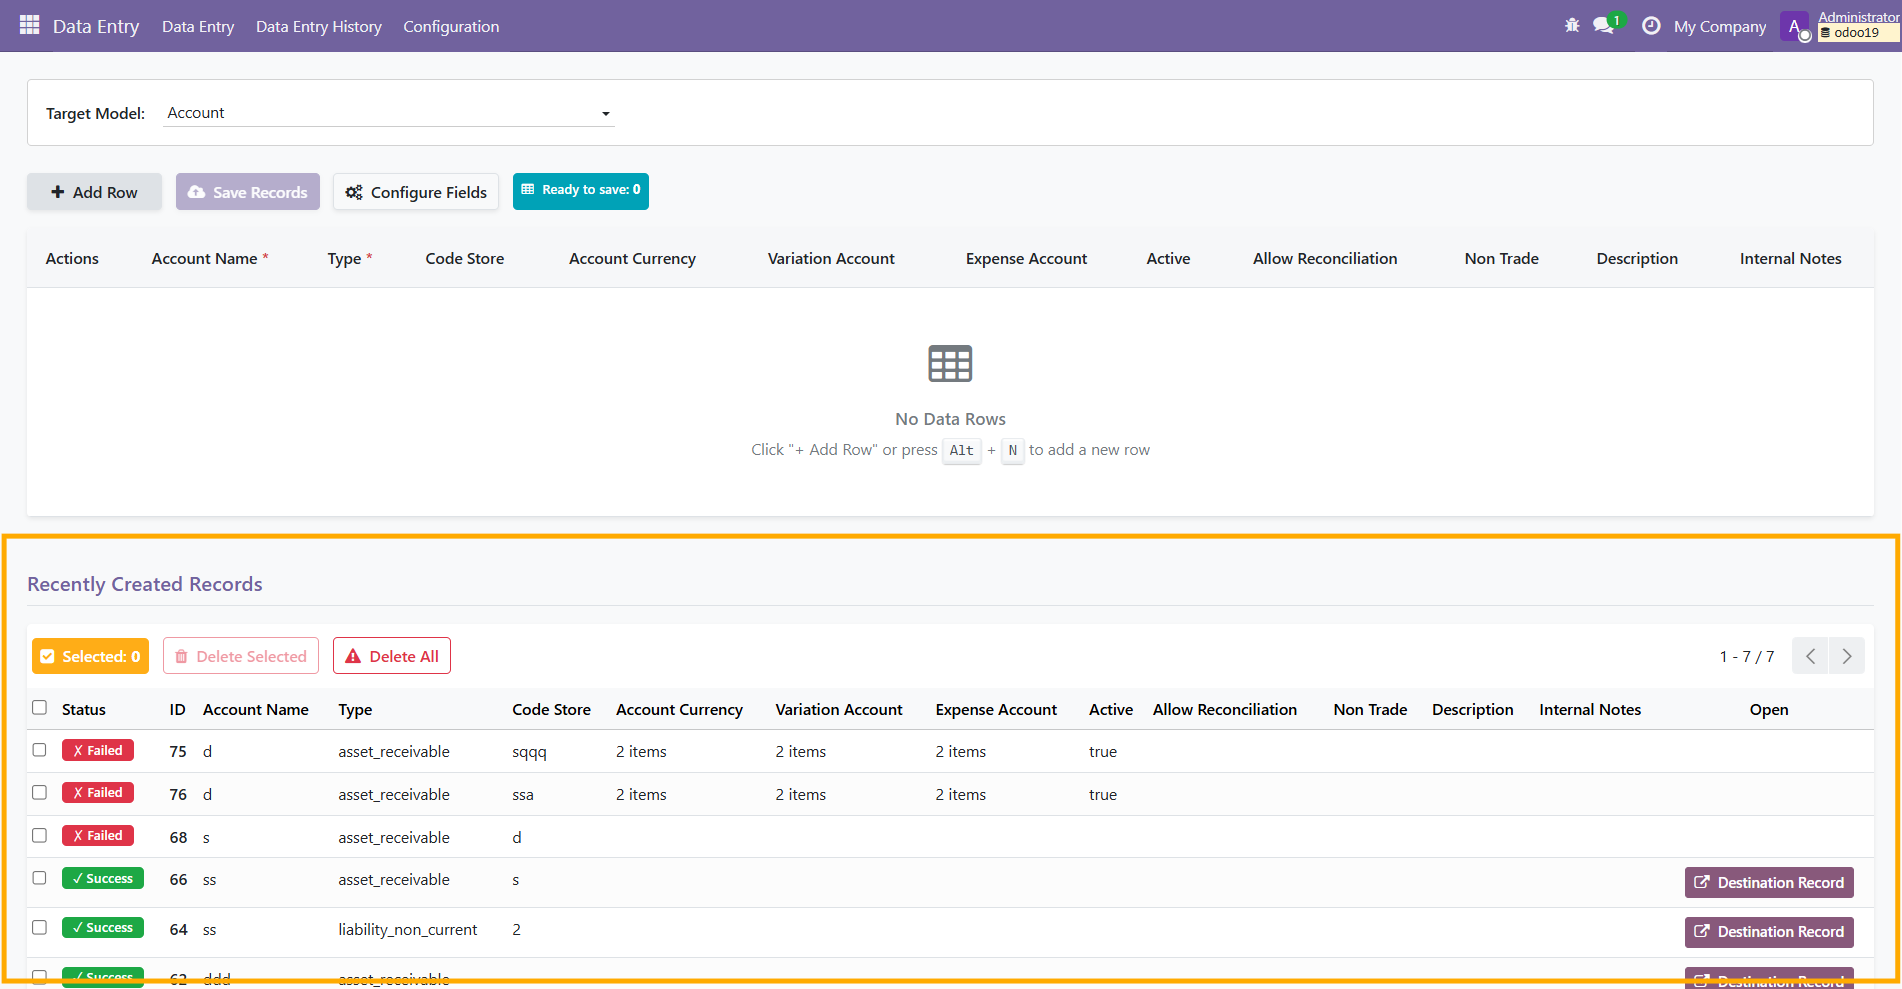
1. 📝 Data Entry
This is the main section for entering bulk data into every Odoo model. The following screenshot shows the main data entry grid where users can select a model and enter records dynamically.
⚙️ Usage:
- Navigate to
Data Entry → Data Entry - Select the target model. All possible fields for the model are generated and displayed based on the selected model.
- Click + Add Row or press Alt + N
- Enter data dynamically displayed based on selected model
- Save records with Save Records button or by pressing Alt + S
- You can duplicate a row by clicking on the button at the start of the row.

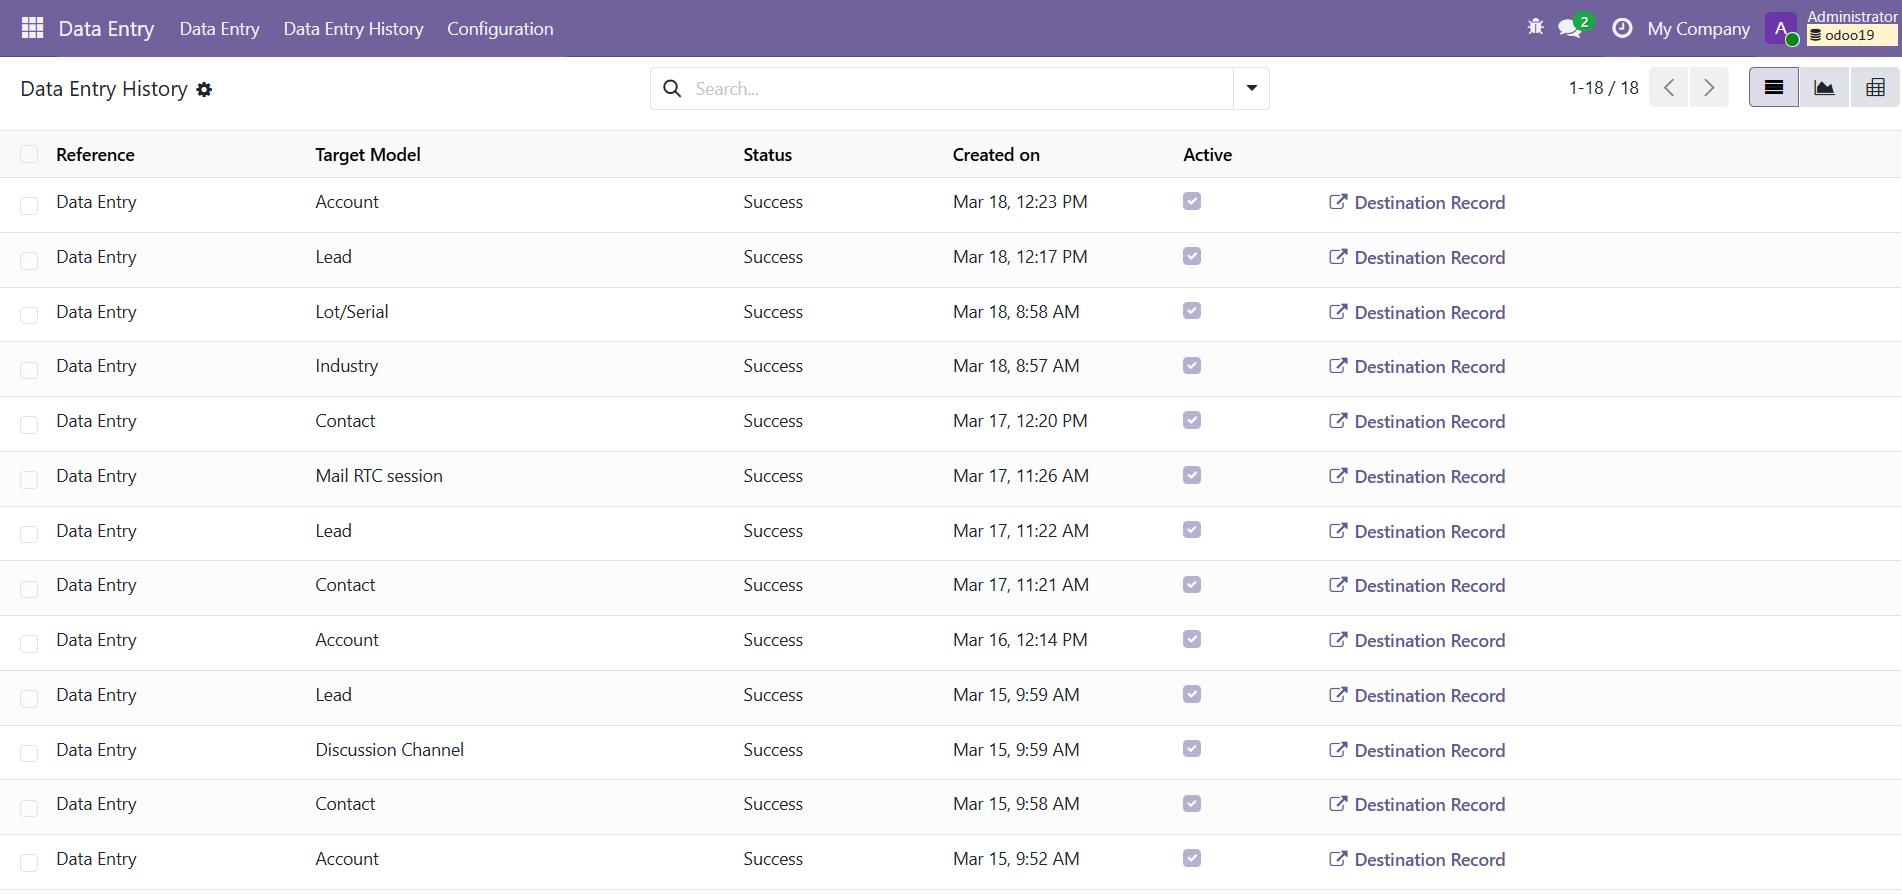
2. 📜 Data Entry History
Displays the history of all recently created records. You can open the
created record in the destination model by clicking on the
Destination Record
button.
For usage, navigate to Data Entry → Data Entry History.
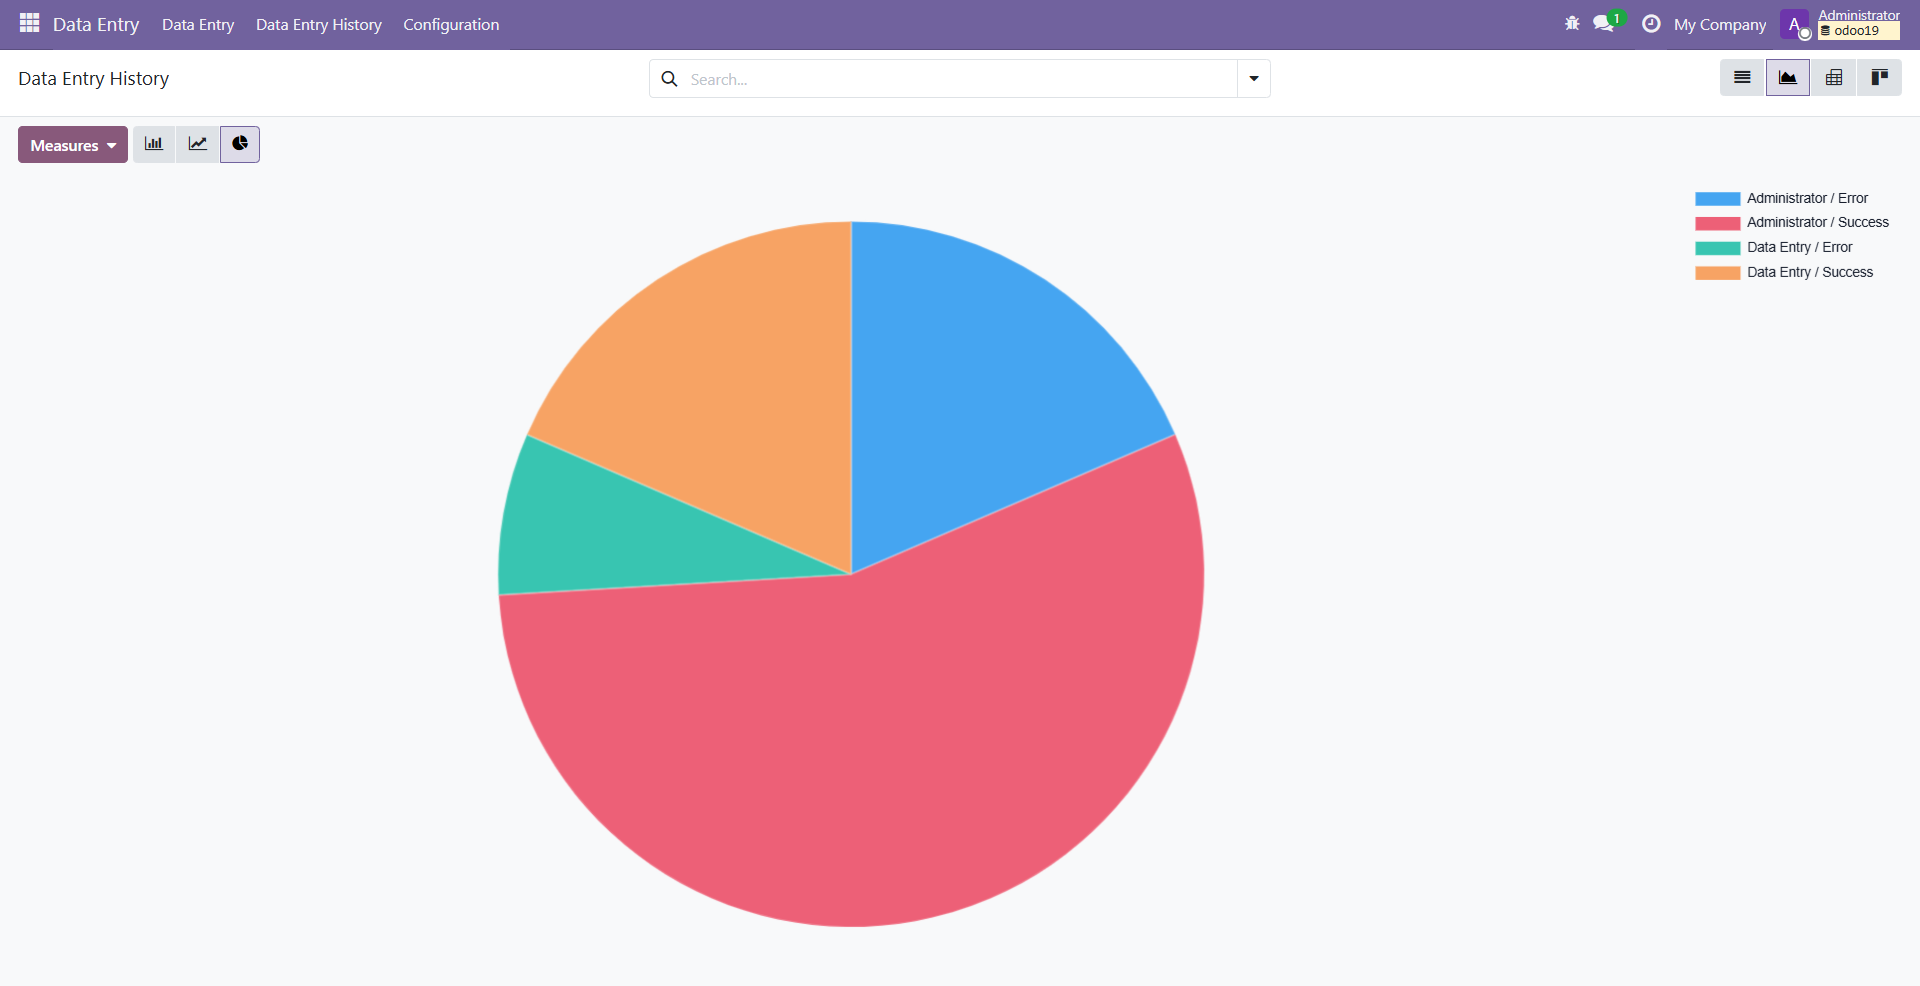
3. 📊 Reporting & Analytics
The module includes a powerful reporting and analytics dashboard within the Data Entry History section. Users can monitor record creation performance, identify errors, and analyze trends visually.
- 📈 View success and failed record statuses
- 🥧 Interactive pie charts for success vs failure distribution
- 📊 Bar graphs to analyze record creation trends
- 🗑️ Select and delete specific logs
- 🧹 Bulk delete all logs
- 🔗 Open successfully created records directly
For usage, navigate to
Data Entry → Data Entry History section.
3.1 🥧 Success vs Failure (Pie Chart)
A visual breakdown of successful and failed record creations helps users quickly assess overall system performance.
3.2 📊 Record Creation Trends (Bar Graph)
Bar charts display trends over time, allowing users to track data entry activity and identify peaks or anomalies.

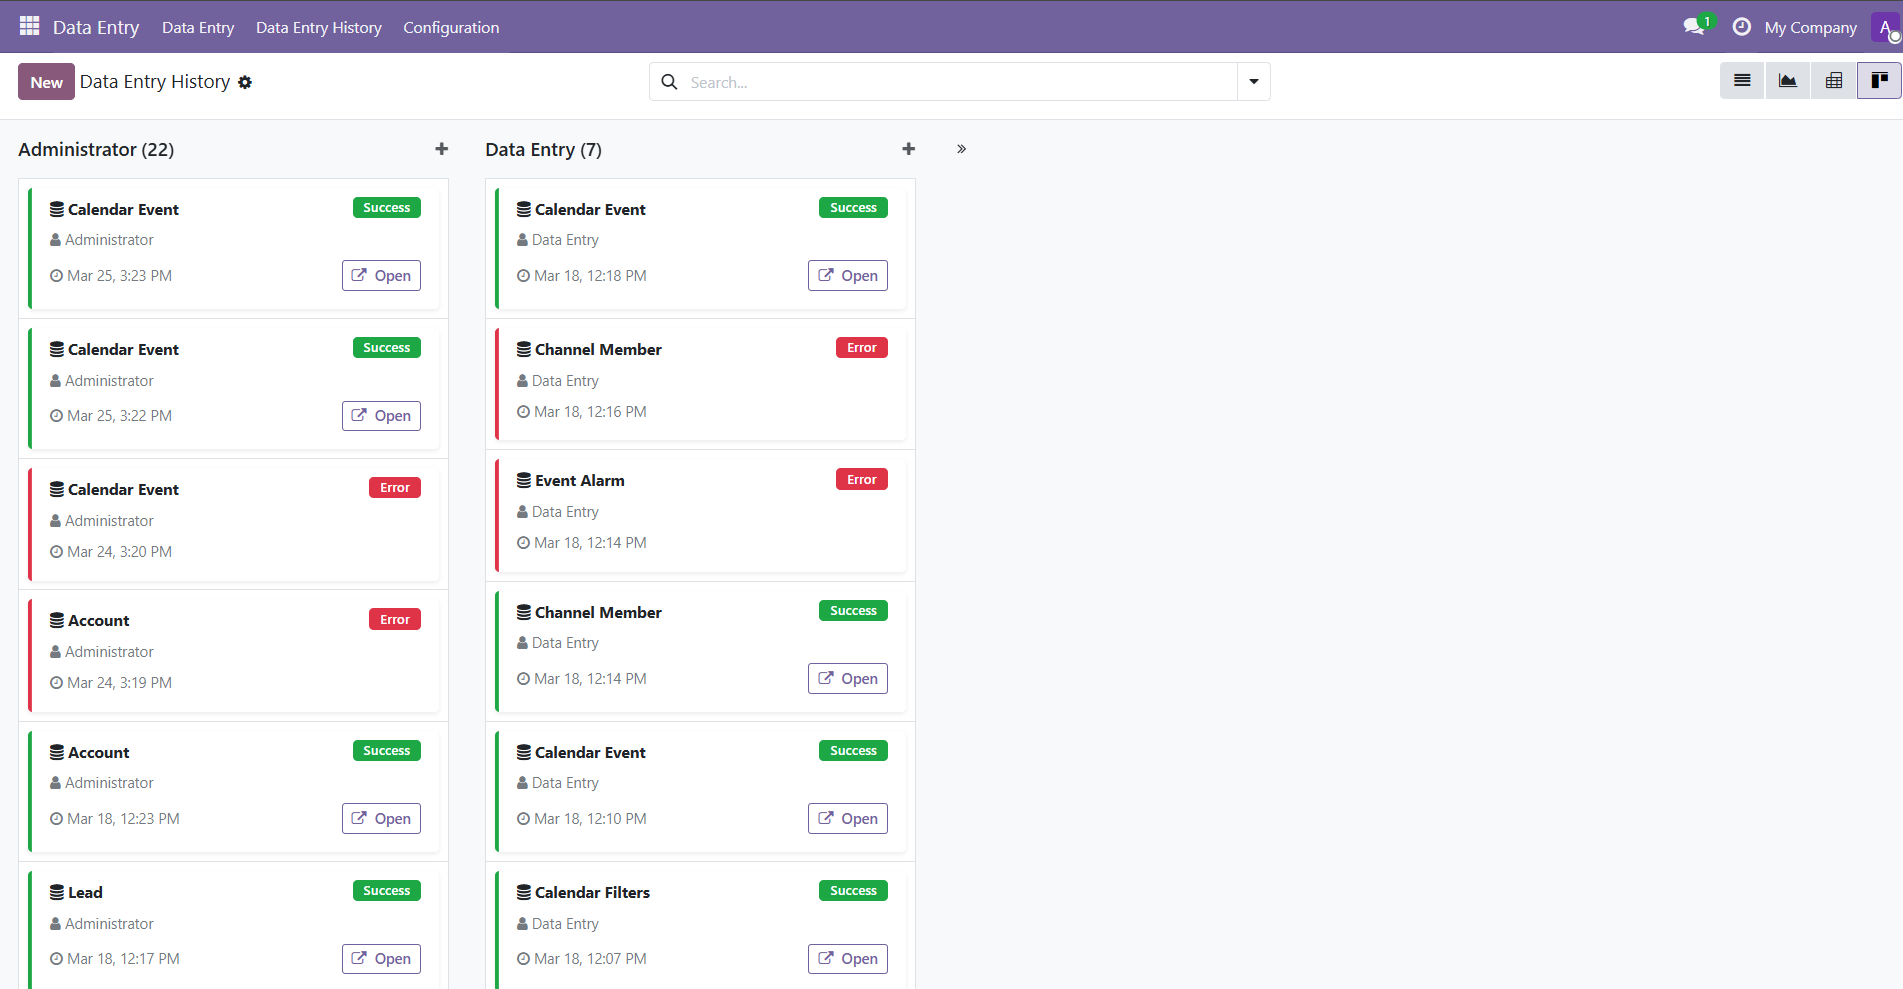
3.3 📋 Record Creation Trends (Kanban View)
Kanban View visualizes data entry progress for each user and helps identify any anomalies that may exist.
3.4 📑 Detailed Reporting Grid
Displays all created records for the selected model with their status. Failed entries are clearly marked and can be reviewed for troubleshooting. Users can open the destination record by clicking the Destination Record button
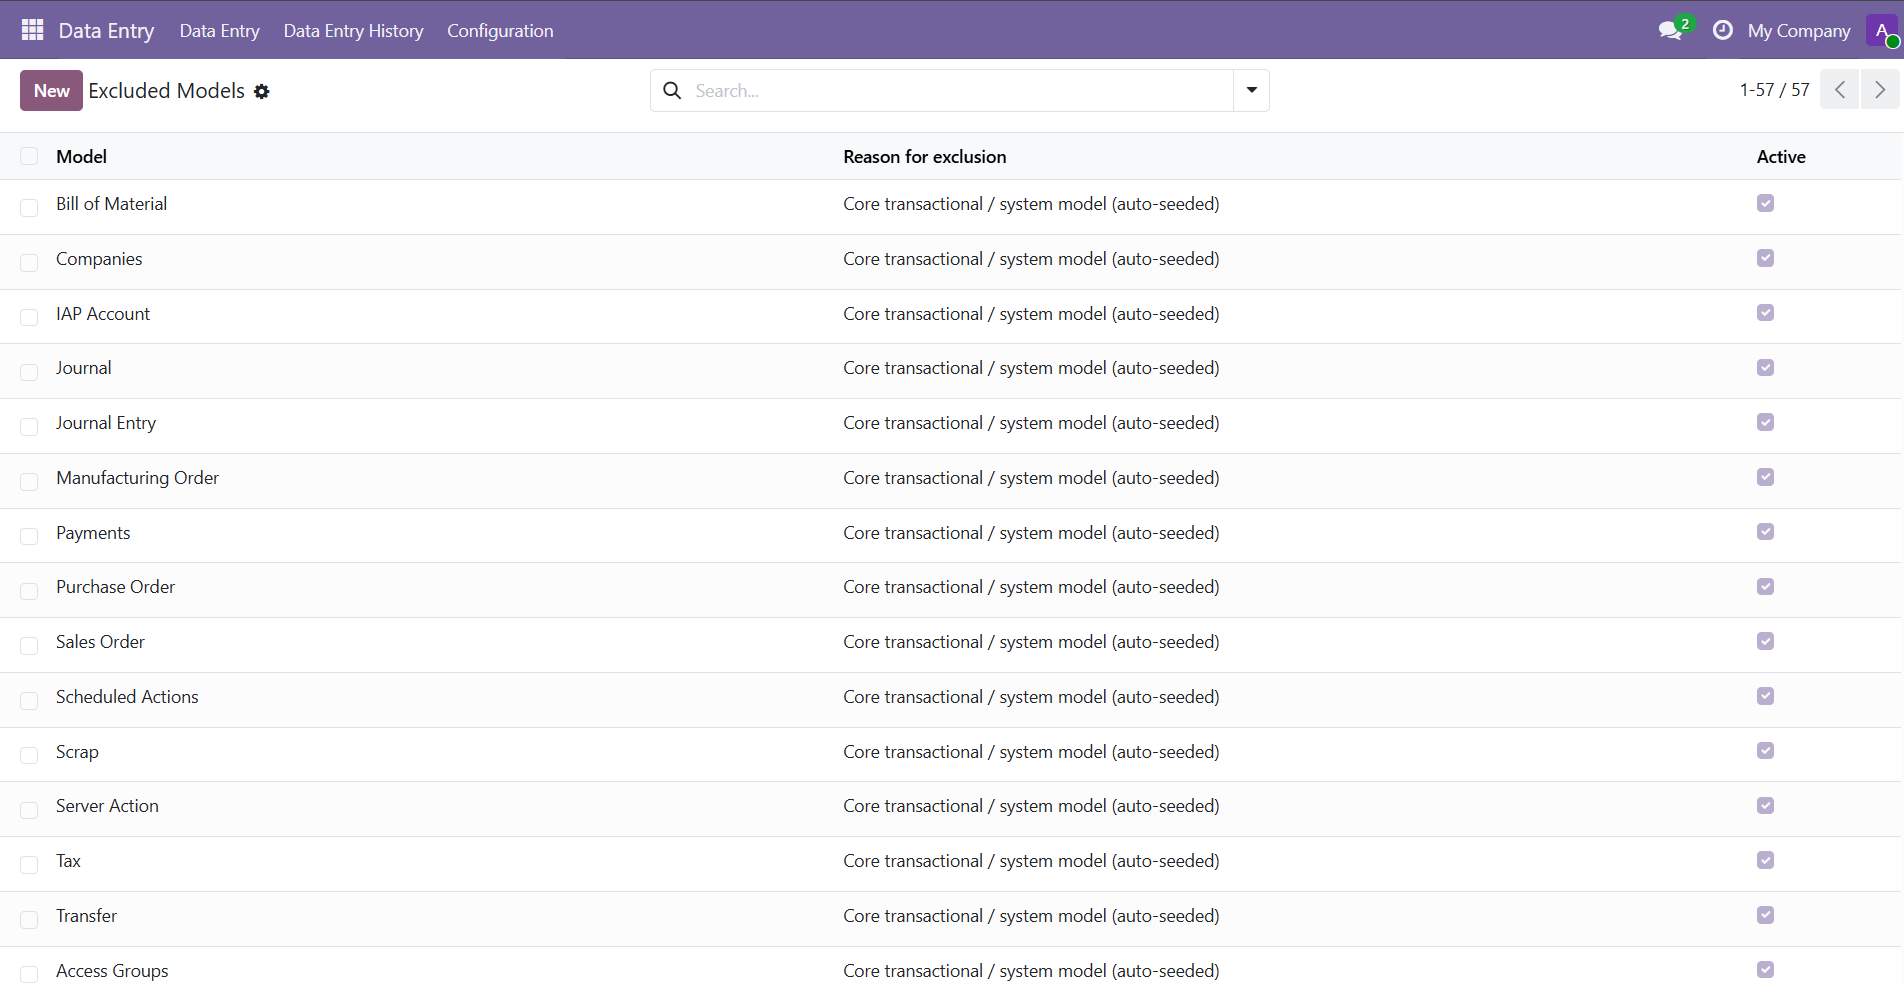
4. 🛡️ Excluded Models Configuration
Shows the configuration panel where administrators can exclude certain models from the data entry interface to protect critical data (most sensitive and system models are excluded by default). Only Data Entry Admin can add, remove and/or modify this section.
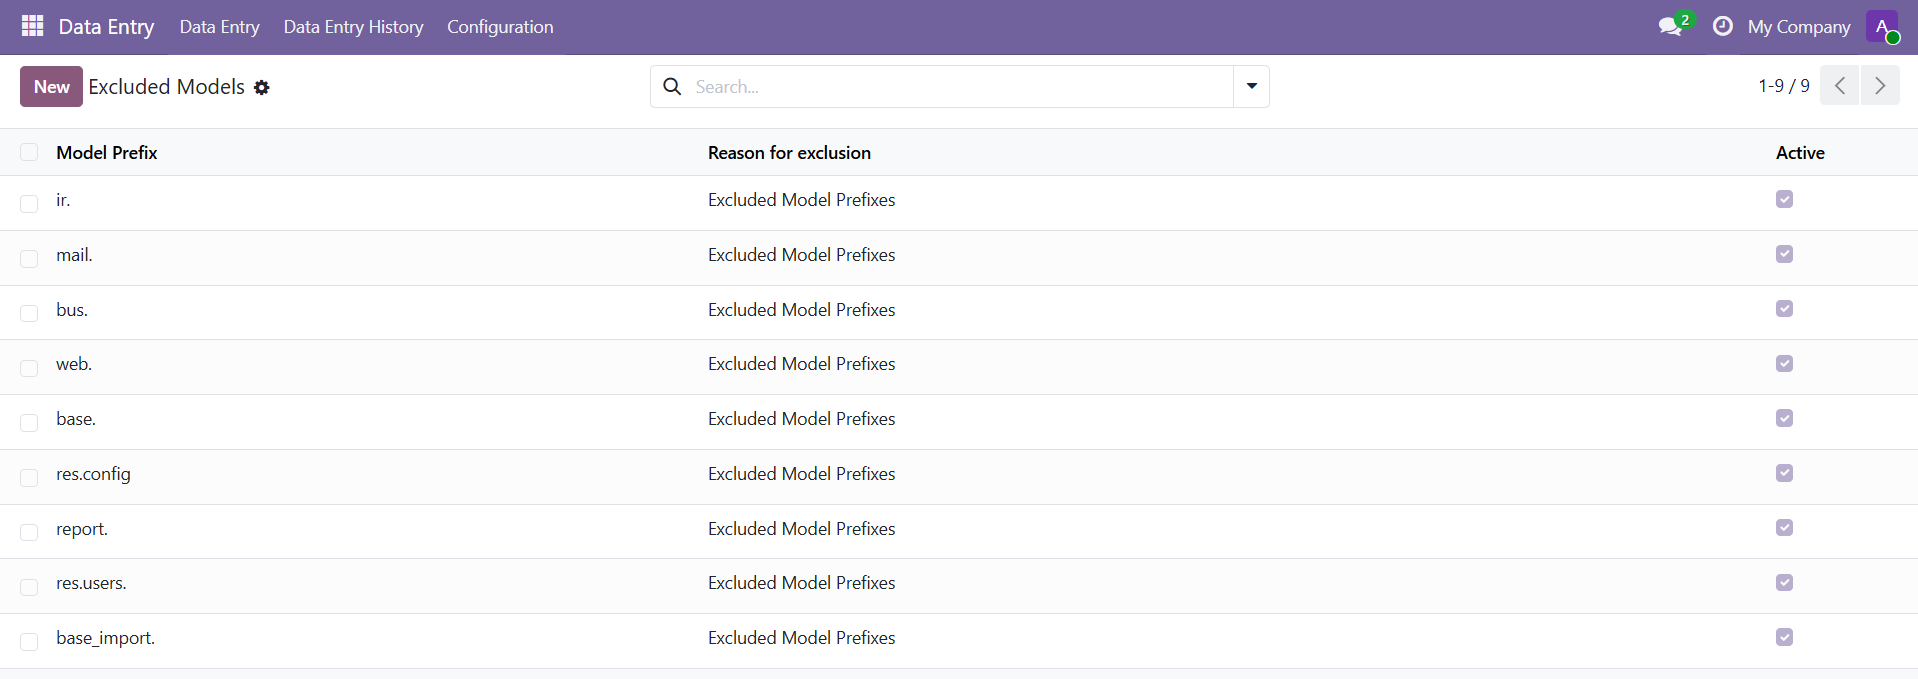
5. ⛔ Excluded Prefixes
Demonstrates how models starting with a specific set of characters of the
technical name of the model prefixes can be excluded from data entry,
preventing models with certain prefixes from appearing in the data entry
selection. (e.g.,
mail., ir., base.). Only
Data Entry Admin can add, remove and/or modify this
section.
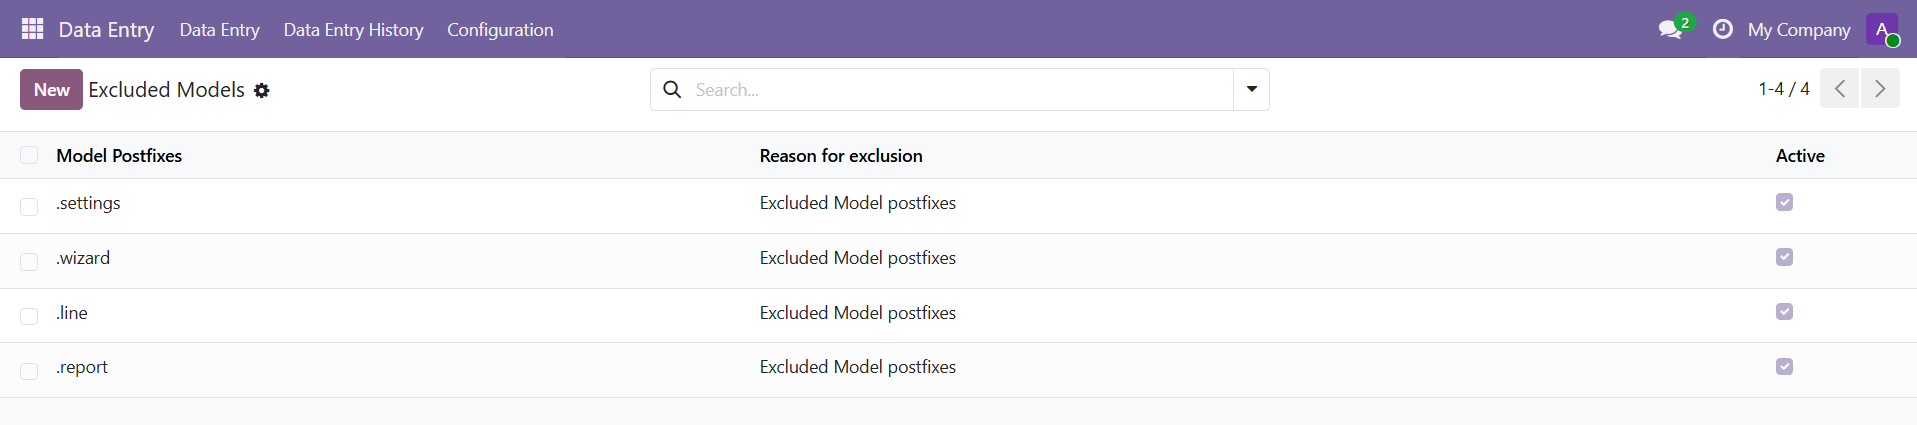
6. ⛔ Excluded Postfixes
Demonstrates how models ending with a specific set of characters of the
technical name can be excluded from data entry, preventing models with
certain prefixes from appearing in the data entry selection. (e.g.,
.line, .log, .history). Only
Data Entry Admin can add, remove and/or modify this
section.
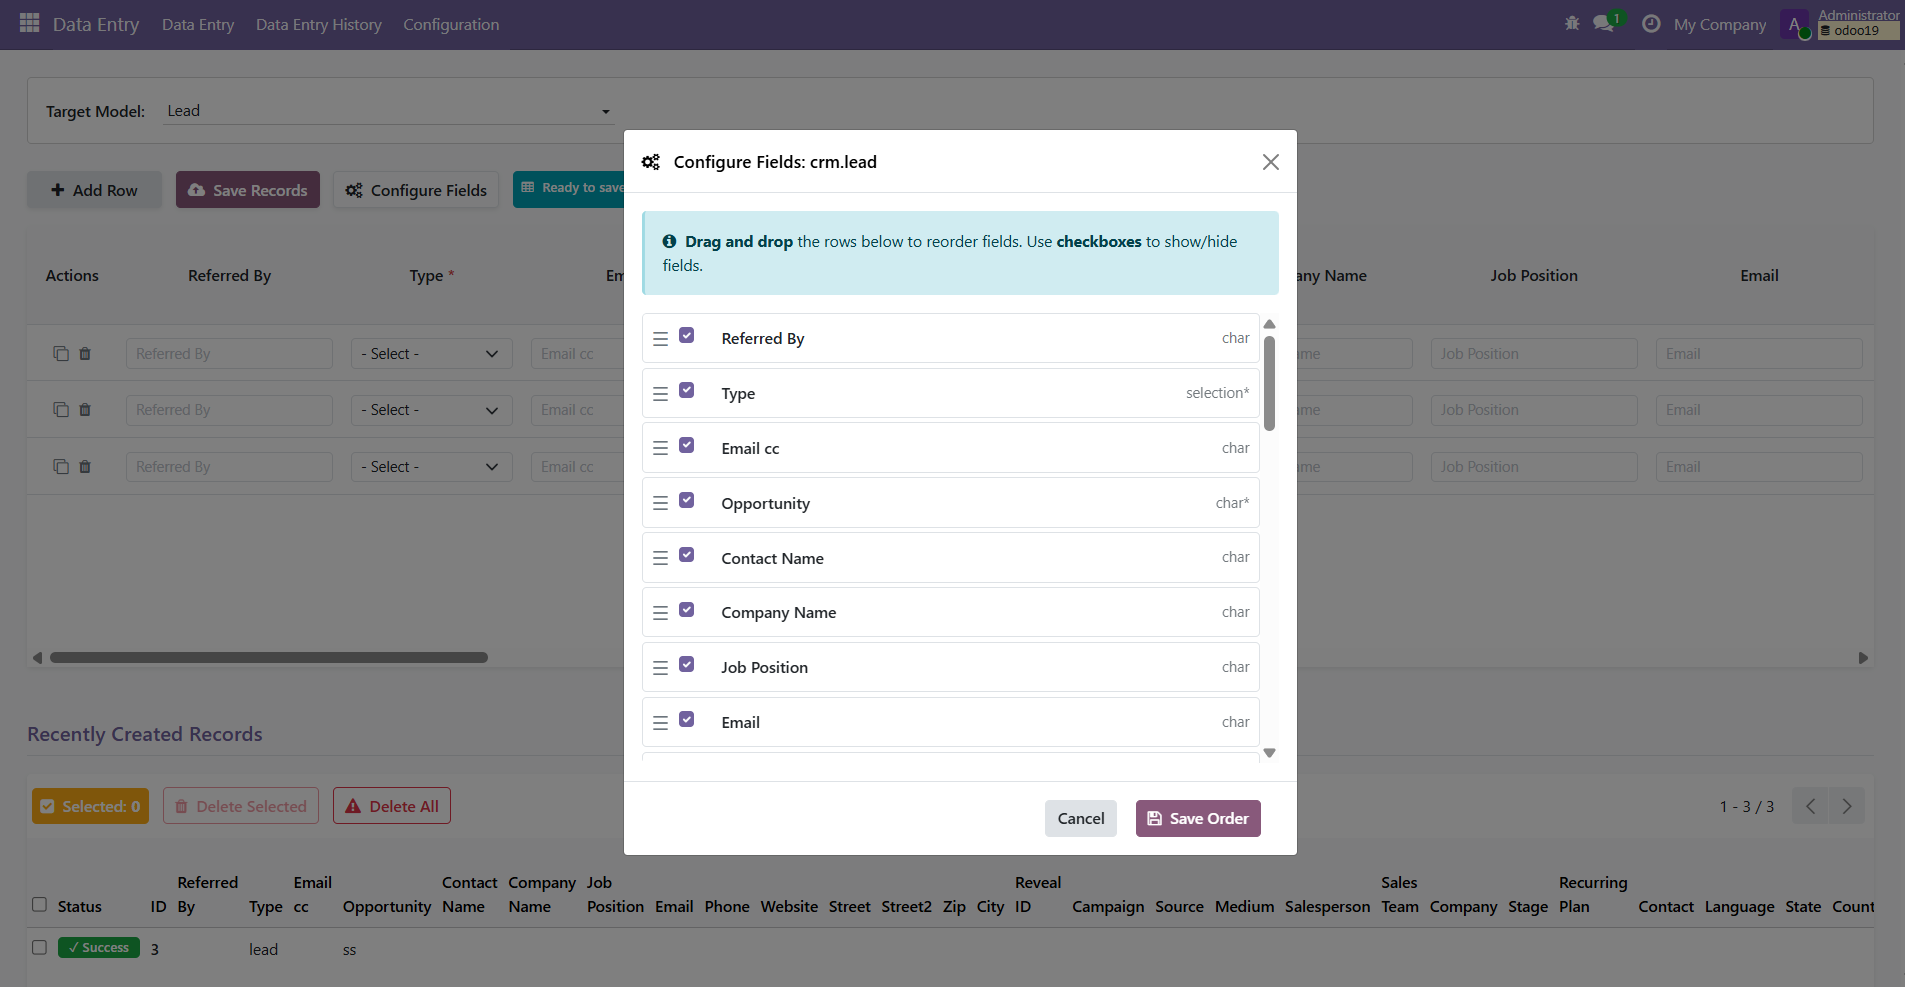
7. ⚙️ Configure Fields
You can reorder/hide/show fields from the data entry grid by clicking on the Configure Fields button.
👥 User Groups
-
Data Entry User: Access interface, create records, view
history.
💡 Users must have Create access on a model to enter data. Models without Create rights will not appear.
- Data Entry Admin: Configure exclusions, manage module settings. Includes all Data Entry User permissions.
⚙️ Default Configuration
Post-install hook seeds default exclusions to protect system models. Admins can modify these via the configuration menus.
📝 Notes
- ❌ Does not support One2many or Many2many fields entry directly
- 🔄 Dynamic field behavior may differ for custom models or future updates
- 🧪 Module tested on Odoo Community Edition only
- ✅ Validation rules applied through Python, XML, or JS may not fully be replicated in this data entry module.
⚠️ Caution
Data Entry Module provides powerful capabilities and should be used with care.
- 🚨Users can create records in any model that is not explicitly excluded. While many of the sensitive models are excluded by default, make sure to add any sensitive or critical models to the list of models excluded from data entry.
- 🔒 Only assign the Data Entry Admin group to trusted and experienced users.
- 🧪 It is strongly recommended to test the module in a development or staging environment before performing bulk operations on production data.
- 🛡️ Review and configure Excluded Models, Prefixes, and Postfixes to prevent unintended record creation.
📦 Other Odoo Apps by the Author
POS Product Performance Report

Track product performance in POS with detailed insights on sales, quantities, and trends to support smarter inventory and business decisions.
POS Excel Reports

Export POS data into structured Excel reports with clear formatting, enabling easier analysis, accounting workflows, and data sharing.
Phone Number Picker

Add a keypad-style input widget to phone fields, allowing users to enter numbers easily with a simple and user-friendly interface.
📄 License
Odoo Proprietary License v1.0